Market Finds

Market Finds
Farmer's Market Bounty

Wednesday, October 16, 2013

Getting Back To Your Roots


Last winter and fall, I was heavy into root vegetables.  Parsnips and turnips appeared in many of my dishes, from braises to soups and even raw as crudités.  Somehow, the carrot never quite made it onto a menu.  Perhaps, I have always miss-associated carrots with springtime and bunnies.  In doing this, I had missed a wonderful opportunity to use this sweet and beautifully hued vegetable in the seasons where it truly belongs. 

What better way to warm up your spirits and your belly as the weather starts to cool down, than with a bowl of my Roasted Carrot, Ginger and Cashew Soup.  Roasting the carrots, brings out the vegetable's natural sweetness and the warming spice of the ginger and red chili can be adjusted to your personal taste.  The recipe, as written below, is slightly spicy on the back end, and can be cooled down by using less chili pepper or by reducing the amount of ribs and seeds used. The cashews in this recipe provide a nice nutty undertone, but more importantly, serve as a thickening agent.  By using the nuts as a thickener rather than cream, the soup is completely vegan.

This recipe will serve 8-10 as appetizer portions or 4-6 as a main course.  Leftovers freeze beautifully and can be reheated for a quick meal on a busy weeknight.

I was very pleased with the outcome of this soup and have been enjoying it for lunch all week.  The flavor only intensifies over time, thus making it a great make-ahead dish as well.  I hope you will enjoy this soup as much as I do and remember to make every plate (or bowl), something to be passionate about.


Beautiful Raw Ingredients


Roasted Carrot, Ginger-Cashew Soup:

Ingredients:

2 1/2 lbs. carrots, cut into one inch pieces
Non-stick cooking spray
1 teaspoon each sea salt and fresh cracked black pepper
1 cup roasted cashews
2 red chilies, stems removed. Ribs and seeds removed from one pepper only
4 cloves garlic
2 inch knob of fresh ginger, peeled
1 cup yellow onion, small dice
2 tablespoon extra-virgin olive oil
1 teaspoon turmeric
1 teaspoon ground coriander
1 teaspoon garam masala
2 quarts vegetable broth
Optional Garnishes:
Chives, Greek Yogurt, Cilantro Leaves, Roasted Carrot "chips"

Step One:
Preheat Oven to 425 degrees.  Place carrots on a foil-lined baking sheet and coat liberally with non-stick spray and salt and pepper.  Bake for 25-30 minutes in preheated oven until carrots are caramelized and softened.

Roasted Carrots

Step Two:
While carrots are roasting, add cashews to the bowl of a food processor and pulse until finely chopped, but not turned into a butter.  Remove from bowl and set aside.  Next pulse garlic, ginger and chilies in food processor until combined and finely minced.  Remove from bowl and set aside.

Minced Onion- Processed Ginger, Chilies and Garlic-Processed Cashews 


Make sure cashews are finely processed, but still powdery
Step Three:
Heat olive oil in a Dutch oven, over medium-high heat. Add the onion and spices and sauté till onion has softened, about three minutes.  Add the ginger mixture and continue to cook, stirring frequently for another 2-3 minutes.  Next, add cashews and stir to incorporate.

Veggies, Spices and Nuts getting friendly in the Dutch Oven
Step Four:
Add roasted carrots and vegetable stock to pot and bring to a boil.  Reduce heat, then simmer for thirty minutes.

Ready for the vegetable stock
Step Five:
Turn off heat and carefully use an immersion blender to puree the soup. Now you are ready to garnish and serve.

Be patient and work the soup to a smooth consistency


Garnished, plated and ready for a close up!

Tuesday, October 1, 2013

That Which Cooks:


One of the best parts of my job, is brainstorming with Chef Nancy over a cup of coffee, or better yet a glass of wine. When our creative juices start flowing and our ideas bounce off of one another at a furious pace, I scribble down notes at Nancy's request to "Write that down!". We come up with some of our best ideas for recipes, classes and marketing strategies and often joke that we could "save the world" during one of these sessions.  Last week we enjoyed a long overdue tete a tete at Starbucks while planning the menu for an Ayurvedic class at Cancer Wellness.  While we may not have solved all the world's problems that day, we did come up with some great recipes, based on the ancient Ayurvedic tradition.Although Ayurvedic healing has been around for thousands of years, it was indeed a new concept to me.  According to Wikipedia, Ayurvedic is an ancient Indian theory that asserts that each human possesses a unique combination of doshas (ones unique mind and body type), that define a persons temperament and characteristics. The three main doshas are as follows:

1) Vata: Space and Air, "that which move things"
2) Pitta: Fire and Water, "that which cooks"
3) Kapha: Earth and Water, "that which sticks"

Eat-Taste-Heal, by authors Yarema, Rhoda and Brannigan is a fantastic resource for aiding one in identifying his or her dosha.  Upon studying the definitions of the various doshas in this book, I have concluded that I am without a doubt a pitta.  Thus, the recipe for Cauliflower "Steak" topped with Pitta Pesto is the perfect Ayurvedic style food for my dosha. The pesto contains cooling herbs that will help to keep me balanced and  the cauliflower, as well contains properties that are beneficial to my particular dosha.

The concepts of Ayurvedic healing are indeed much more complex than the brief overview I have provided here. However, the bit of research I have done on the topic has been quite fascinating, and certainly reinforces the ideas of healthy and mindful eating that Chef Nancy and I preach to our clients on a daily basis.  To all of my fellow Pittas out there, enjoy some cooling Pitta Pesto, and remember to make every plate something to be passionate about!

Cauliflower "Steaks" with Pitta Pesto:

Cauliflower Steak Ingredients:
1 head cauliflower
1 tablespoon extra-virgin olive oil
2 teaspoons ground cardamom
1teaspoon sea salt
1/2 teaspoon fresh ground black pepper

Step one:
Remove outer leaves an tough stems from cauliflower, while leaving the vegetable intact.  Cut the head vertically from top through the stem into 1 1/2" thick "steaks". An average sized head should yield 4-5 pieces.

Step two:
Rub both sides of the cauliflower pieces evenly  with the olive oil and spices.  Place on a sheet pan coated with non-stick spray and bake at 425 degrees for about 25-30 minutes, until the vegetable is tender and nicely browned on the top.

Pitta Pesto Ingredients:
2 cups arugula
1 cup dill
1 cup cilantro
1 clove garlic
1 oz freshly grated parmesan cheese
1/2 cup of toasted walnuts
Zest and juice of two lemons
1/2 cup extra-virgin olive oil
Salt and pepper to taste

Optional Garnish: colorful assortment of sliced grape tomatoes, 2 cups

Step One:
Place all ingredients in the bowl of a food processor and pulse to combine. Scrape down the sides and season to taste with salt and pepper. Pulse once more, then serve on top of warm cauliflower steak. Garnish with an assortment of sliced grape tomatoes if desired.

Friday, June 21, 2013

Playing With Fire


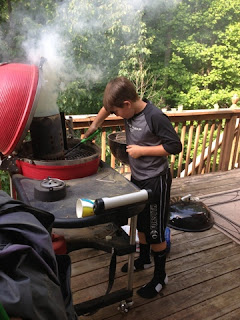
What is it about guys and their grills?  Even my little guy has been curiously observing his dad, uncles, grandpas and other adult males partake in the ritual of grilling his whole life.  As of late, though, he has moved from observer to full on participant.  Not only can he build a fire, he also wants to be hands on in the preparation of the meat or veggies going onto the fire.  Of course I am immensely proud of his can do attitude, but being the kitchen control freak that I am, I must admit that I have had a bit of difficulty relinquishing my salt and pepper shaker to him.  I have typically been the dutiful wife/daughter who seasons up the meats and delivers them on a platter to the guy who is manning the grill, then retreats back to the kitchen. Only to emerge outside later to gently remind the grill master that eventually, it would be nice to eat. 

We have been grilling a lot at home this summer, even when time and weather are not conducive to striking up the charcoal grill, the hand indoor grill is a fun option.  Ironically, my semi-vegetarian child loves to grill lamb chops.  I suppose an underlying caveman-like instinct, present in most males is responsible for this.  I just go with it.  I enjoy the occasional lamb chop and always chant a sweet victory cheer when either of my children eat something outside of the kids menu trifecta of hot dogs, chicken nuggets and grilled cheese.

Grilling has turned out to be a wonderful diversion in my continuing effort to educate my children about eating healthier.  You can make an entire meal on the grill and spend some precious time outside, away from the television, X-box and the other technological diversions that seem to always intrude in our lives.
So grab some olive oil, salt and pepper and your tongs and season up your favorite meats and veggies and get grilling.  The beauty of the grill is that most of the flavor in your finished product comes from the smoke, so you really don't need any complicated recipes.  Hit the farmer's market for some fresh, local ingredients and enjoy some quality time outside with your friends and family this summer.

Friday, May 10, 2013

Table for One:


I am sitting in France as I write this post. Not really France, but France of the Epcot variety. I am sitting in France alone, eating lunch. For those of you who travel for business, this may not be such a big deal, eating alone that is. But for me, I have spent my entire life avoiding eating alone. I am a self conscious creature by nature and eating alone brings out some of my biggest insecurities.

For me, sharing a meal with other people, is not just about the food, but the fellowship as well.  Can you have fellowship when you are alone?  As it turns out, you can, and I did!  In fact, I sat for a good hour at my little bistro table, soaking up the sun, people watching and reminiscing about my real time spent in France, so many years ago.  Of course, I recalled the first thing I ate when I arrived in France for an internship.  The lovely couple who picked me up from the airport gave me a sandwich to eat in the car on the way to their house.  It was not the the foot-long submarine from Sub Station II in Clemson, which came with your choice of every type of vegetable, meat, cheese and condiment you could imagine.  No, this was a simple sandwich on a piece of crusty baguette.  One slice of ham, one slice of cheese and a light shmear of salted butter on the bread.  C'est tout!  I loved that sandwich then and as it turns out, it was not that far off from the baguette jambon au beurre that I was enjoying here in faux-France, Chez Disney.  Okay, the Disney baguette, had two pieces of ham and two pieces of cheese, but when you are paying $8.00 for a sandwich, I appreciate the extras.

The bottom line is, to take the time to enjoy your meal, whether it is a feast with family and friends, or a simple lunchtime sandwich.  Your body with thank you for the nourishment that it's given when consumed in a mindful way.  So remember to make every plate something to be passionate about, even if it is a paper plate.

Baguette Jambon au Beurre:
Serves 1

1 5-6 inch piece of fresh, crusty baguette
1 thin slice of best quality ham
1 thin slice of Emmenthaler cheese
1/2 TB of salted butter, room temperature

Assembly:
Slice baguette horizontally, but not all the way through.  Spread each side of bread with softened butter and place the ham and cheese inside.

Close the sandwich and place on a plate.  Sit down at a table and savor this simple delicacy!


Thursday, May 2, 2013

Holy s#%@! It's Spring


Please don't be offended by my blog title this week ( I'm mainly talking to my mother here), as it is a bit tongue in cheek. I attended a writing workshop recently where we learned about writing a catchy title and an opening sentence that would capture the readers attention. We were advised not to state the obvious. For example: "It's spring and strawberries and asparagus are in season". Well, I have been so worried about how to come up with an interesting way to introduce my spring veggie sauté, that I have almost allowed the entire season to pass me by. So, my writing  may still need some work, but my spring veggie saute is near perfection.

This particular mixture of veggies came together for a class at Cancer Wellness a couple of weeks ago.  I love the simplicity of it's fresh green taste.We served it up, warm,  on a bed of brown rice, as pictured below.  Leftovers can easily be reheated or served cold in a lettuce salad.  I also made a delicious fritatta with the same veggie mixture.


Don't let the bounty of springs fruits and vegetables pass you by.  Take advantage of the season's tender asparagus and fresh peas.  And don't forget the leeks.  This is an often overlooked vegetable.  A member of the allium family, leeks provide a mild onion flavor and a lovely texture when cooked.  I hope you will enjoy this versatile dish as much as I do.
 
Spring Vegetable Saute:
1 TB Olive Oil
3 leeks, cut crosswise, white and light green parts only*
1 cup Fresh or Frozen Peas (defrosted)
1 bunch Asparagus, cut into thirds
zest of one Lemon
1 garlic clove, grated on a micro plane
1/4 cup chopped Parsley
 
Step One:
Heat olive oil in a large saute pan over high heat. Add the leeks and stir to coat with the oil.  Next add the peas and asparagus and continue to stir gently for about 3-5 minutes.  The vegetables will start to turn a nice bright green when they are ready.  If you are a fan of overcooked southern-style vegetables, this is not the recipe for you.  This is more of a crispy stir-fried type dish.  They will soften a bit, but should still have a nice crunch as well.
 
Step Two:
Turn off the heat and grate the garlic clove directly into the pan along with the lemon zest and salt and pepper.  Stir to evenly distribute the seasonings amongst vegetables. 
 
Step Three:
Remove veggies to a serving platter and sprinkle with chopped parsley.
 
Happy Spring and remember to keep every plate passionate, no matter what the season!
 
*Leeks are typically a very sandy vegetable, so it is important to make sure they are cleaned properly.  My favorite way to do this, is to cut off the root tip, then make a horizontaly cut through the leek, starting where the light green part begins and through to the end of the white tip.  Now you will be able to access the many different layers of the leek while you rinse under cool water.  You can cut the leek at this point as directed in the recipe and then give it a spin in the salad spinner to remove any excess water or sand. 


Thursday, April 25, 2013

Hypocrites Remorse


"Are you sure this is healthy? This is the most fried, unhealthy looking thing you have ever made", said my son last week. Typically this is not the statement a healthy chef wants to hear about their latest creation. But to me, It was music to my ears. This was a success story and here's why.

As I sat in my professional conference earlier this month and listened to panel discussions about the importance of fresh, local, organic, non-processed foods, a voice in my head kept chanting, "you are such a hypocrite!"  I heard this voice over and over for four days.  What makes me a hypocrite you ask?  It is the fact that I spend my days cooking healthy, fresh, local and organic meals for my clients.  I even get up on my soap box on a daily basis to these same people and preach about the virtues of eating healthy food, that you make yourself, and how a bit of careful preparation on the weekend can set you up for a week of homemade meals.  The problem is, I was not doing this at home for my family.

Like any temperamental chef/tired mom, I rebelled when my kids did not want to eat the sauteed kale over a bed garam masala scented quinoa.  What was wrong with them?  The adults in my class loved this dish at lunchtime today.  Each time my kids rejected one of my new healthy creations, I became more and more frustrated.  So much so, that over the past couple of months I basically stopped making dinner altogether.  Dinner time became a constant "fix it yourself" situation.  Each of us on our own to throw together what we wanted in the short span of time between arriving home from school or work and before heading out to the evenings sports activities.  Sandwiches, cereal and gasp, frozen waffles and biscuits became mainstays.

I resolved then and there as I sat listening to the farmers, chefs, authors and advocates of the fresh, local food movement, that there would be some big changes when I got home.  I considered coming home and emptying all of the boxed foods from my pantry.  I was going to make all my own bread and crackers.  No frozen chicken nuggets or waffles.  This was going to be radical!  Well, with five hours to kill on the plane ride home, I realized that radical was probably not the best way to go.  I needed to be subtle, weaving new things in, while gradually taking some of the bad things out.  Think like a kid.  Think about the things they liked the most and were the staples of our "fix it yourself" lifestyle.  Additionally, I needed to get over my own hurt feelings and start thinking about the kids.  I'm quite certain I would not have wanted to eat kale and quinoa as a ten or fourteen year old.  I would have to save my uber healthy greens and grains for work and soak up my accolades there.

Like all busy parents, I am tired at the end of the day and truly do not feel like cooking when I get home, especially when I have been cooking all day.  I really can sympathize with the average American family who chooses the convenience of the drive thru over preparing a meal at home.  I have all the tools and knowledge to do the right thing, yet fell right into the rut of doing what was easy instead.

So, I am three weeks in to my continuing effort to make an effort at dinner time.  Thus far, some of the highlights have been making sushi with my son, roasting a whole turkey breast which was dinner one night and sandwiches for the lunchbox for the rest of the week.  There has been more fruit and no frozen breakfast items.  So, I'll admit, there is still a box of cheese crackers in my pantry, because let's face it, I really just don't have time to make cracker dough and cut out goldfish shapes.  I am sharing today, one of the my kid's new favorites.  It has the appearance of being bad, but is in fact a much better option than a similar item at drive thru.  This is not rocket science, it is just putting my own ego aside and trying to think about things my children love and making them better.  As a result, of my new way of approaching dinnertime, I am happier, the family is happier and the nagging voice in the back of my head chanting "you are such a hypocrite" is fading away. 

I hope you will enjoy my easy and versatile chicken recipe and remember to make every plate something to be passionate about.


"Faux-ride" Chicken:
6 boneless, skinless organic chickenthighs
1 cup non-fat greek yogurt
1/2 cup plain breadcrumbs
1/2 cup whole wheat panko
1/4 cup grated parmesan cheese
1 teaspoon paprika
1/2 teaspoon garlic powder
1/4 teaspoon sea salt
1/2 teaspoon fresh cracked black pepper
1/8 teaspoon cayenne pepper
Non-stick cooking spray

Serving Suggestion:
1 recipe of Honey Mustard Sauce*
2 cups shredded napa cabbage
Whole grain buns or wraps

Step One:
Cut the chicken into desired size.  See picture below for ideas.  Fingers work the best for wraps, patty's or slider cut for sandwiches on a whole grain roll and nuggets for straight up dipping.


Step Two:
Place chicken in a ziploc bag with the Greek yogurt and set aside while you make the coating.
Step Three:
Place the bread crumbs, panko, Parmesan and spices in a shallow dish or pie plate and stir to combine.  Remove chicken from Ziploc bag and dredge in breadcrumb mixture.

Step Four:
Place coated chicken on a foil-lined sheet tray, sprayed with non-stick spray.  At this point, I like to sprinkle a little more paprika on top of the chicken as it helps give the finished product a more "fried" appearance.  Spray top of chicken with non-stick spray before placing in the oven.


Step Five:Bake chicken at 400 degrees for about twenty minutes.  You want to make sure the internal temperature of the chicken is at 165 degrees.  I highly recommend investing in an instant read thermometer.  The good news is, that if you get caught up with the laundry, bills or homework, chicken thighs are very forgiving and will still be moist and tender, even if they are slightly overcooked.


The finished product is a moist, tender and flavorful "faux-ride" piece of chicken.  Serve as is or as a wrap or sandwich. Leftovers freeze well.


Honey Mustard:
As I have learned, making your own dressings is so easy and should be done on a weekly basis.  I promise, once you start to make your own dressings and vinaigrette, you will have a hard time going back to anything in a bottle.  This is one processed item, that was easily eliminated from my pantry. 

1/2 cup Light Olive Oil Mayonnaise
1/4 cup Yellow Mustard
1/4 cup Local Honey

Step One:
Place ingredients in a bowl and whisk to combine.  This dressing will keep in your fridge for up to five days.


The end result is a great tasting wrap that kids and adults with enjoy and feel good about eating!


Thursday, April 18, 2013

IACP Conference, San Francisco 2013


Feeling as though you have finally found your place in the world, yet at the same time, feeling as though you are completely out of your league. That is how I feel when attending the International Association of Culinary Professionals conference each year. I love the ease of being around people who share your similar passion for food, and who are not at all miffed when you stop to take pictures of all of the plates on the table before eating a meal. You can plan for dinner, while still eating lunch. Exchanging business's cards and ideas, as well as learning from experts. That is what the days are filled with at this event.

The experts are the ones, that initially made me feel as though I was totally out of my league. As a relative newcomer to the professional food world, sitting in the same room with Thomas Keller, Maxime Bilet and Joyce Goldstein is utterly amazing. Not to diminish any of these people's accomplishments, but when they begin to speak, you realize that your commonality far outweigh your differences. To hear an accomplished chef, speak with the enthusiasm of a small child on Christmas morning,  when describing the freshness of the pea juice he extracted from the vegetable with a centrifuge, made me smile. I know that feeling.  I get it often in the kitchen when something tastes especially wonderful or looks spectacularly beautiful. I get it! The passion for your craft, the discovery of new techniques and flavors. It is what binds us all together, despite the kitchen in which we are cooking.

Needless to say, the trip was fantastic, the scenery, food and camaraderie were unmatched. I also gained a new found respect for the people of the Bay Area. There passion for freshness and quality in the food they prepare and consume is inspiring. I hope to implement these new ideas in my own kitchen, moving forward.

I hope you will enjoy the small sampling of the photographs I took while on my trip to the west coast.  Each of these pictures moves and inspires me in their own special way. Enjoy, and remember to always make every plate something to be passionate about!


Beautiful blistered shishito peppers at The Ferry Plaza Building

Fruit display courtesey of Driscoll's Berries

Chef Nancy's new buddy at Truchard Vineyards, Napa Valley

Would eat this delicacy from Craftsman and Wolves for breakfast everyday

The incredible Bi-Rite Market in the Mission District.  So much more than a grocery Store!


Tequila tasting at Tacolicious

Wonderful fresh pizza and salads at this Mission District gem

Fresh, raw oysters at Ferry Plaza Seafood

No trip to San Fransisco is complete without a tour of Chinatown

Clean plate club for me! Could not leave a morsel of this bucatini and broccoli rabe pasta at Zuni Cafe

Had to travel all the way to San Fransisco to have the chance to spend quality time with Atlanta Chef, Rosemary Rutland

Chef Nancy Waldeck and Chef Carlin Breinig enjoying an Irish Coffee at Buena Vista Cafe

The best Irish Coffee!


And the sun sets on an incredible adventure


Thursday, March 21, 2013

My Cheesy Excuse: Part Deux

So, I find myself this week without a new recipe for my blog. Unfortunately, the stomach flu hit my son and me, and food was about the farthest thing from my mind. I decided to repost a blog that originally appeared on the Taste and Savor site last year, but never got transferred to my passionate plate blog. Ironically, this blog is about an evening when I was supposed to be home writing, but found myself spending the entire evening with a friend, bottles of wine and a big hunk of stinky cheese. Sounds, like fun, wish that was what I had been up to this week.

The good news is, that we are all feeling better and are moving off of the clear broth and Saltine cracker diet that have been our staples this week. I am already thinking of my recipe for next week and excited about the new crop of spring veggies coming our way.

As always, keeping every plate passionate, even if it is a plate of Saltines.

This blog originally appeared on tasteandsavor.com on Sept 5, 2012.

Despite all of my intentions to write a new and interesting blog each week, there are instances when my hectic schedule leaves me with little time to sit quietly at my keyboard and write. Typically, I have a valid excuse such as, I worked three thirteen hour shifts in a row or I was carpooling the kids all evening. Last week was not one of those times.
Last Thursday, I had every intention of stealing off to my office and writing up a new blog and recipe that I had made earlier in the week. But alas, I was invited over to my neighboor's house for a "glass" of wine. This is really code for "let's chat and drink a bottle of wine". Since Carol was kind enough to supply the bottle of wine, I could not arrive empty handed, so I pulled out a nice piece of cheese that I had been saving for a special occasion. So pehaps, this was not the special occasion I had in mind, but wine, cheese and good neighbor's company would suffice.
I walked into Carol's house with the immediate disclaimer that the odor she may smell was not me. Many times it is me of course, because after a day in the kitchen with onions, garlic and other offending smells, well, you get the picture. In any case, the slightly funky smell was from my prized block of cheese, that I brought to share. This cheese is one of my new favorites and was of course introduced to me by Chef Nancy. It is called Morbier.


Morbier is a semi-soft cow's milk cheese from France. It resembles a blue cheese, but the vein running down the middle is actually thin layer of tasteless ash. The cheese was still cold out of the refrigerator when we first tasted it. It was delicious of course, but the flavor was not yet fully developed. As we sat and talked over the next couple of hours, it was great fun to see how the taste of the cheese changed and improved as it warmed up to room temperature. Needless to say, the time passed, the wine was gone and all that remained of the Morbier was a lifeless rind sitting on a plate.


Yikes! I had spent the entire evening eating cheese and drinking wine. No time for a blog this evening. I had to walk home and make some dinner for the kids and get everyone organized for school and work the next day.

I hated having to tell Nancy that I had no new blog for her on Friday morning, but I kept my fingers crossed that she would see the humor in the picture of my "dead soldier", shown above. She is afterall, a Partyologist! Luckily, she did, and I ended up getting a blog out of my evening, albeit a week late.

So, the next time, you feel the urge to procrastinate and or just spend a nice evening with a friend, take along a nice slice of Morbier to share. I buy mine at the Buford Highway Farmer's market and have seen it at Whole Food's and occasionally Costco. Oh, and if you need to bring the wine as well, try a nice Pinot Noir. Enjoy!


Thursday, March 7, 2013

Invite an Italian To Dinner


This Roasted Red Pepper Alfredo came about at work one day, when Chef Nancy and I were up to our elbows in food prep for a Thanksgiving meal for the participants at Cancer Wellness last fall.  Now, you may ask, who in their right mind would stop in the middle of such a large production to sit down and eat lunch, much less a big bowl of pasta.  Well, we would.  As I have mentioned before, we always try to take a few minutes to sit down and take a break for a midday meal.  Usually it's a salad, made from whatever we have leftover in the kitchen.  This day however, there was not a leaf of lettuce to be found, as we scrambled in true Iron Chef fashion to grab whatever spare ingredients we could find, and put together a quick meal.

What I came up with was a jar of roasted piquillo peppers, a log of goat cheese, a block of parm and some whole wheat elbow macaroni.  Perfect, a little pasta would power us through the long afternoon and evening ahead.  The result of my kitchen scavenger hunt yielded a beautiful and comforting Alfredo sauce, that is much lower in fat and calories than the original.  This dish has since, become a staple at home, and is a quick and easy weeknight treat. 

Try inviting this light and saucy Italian to your house for dinner tonight.  Remember to make every plate something to be passionate about.  Buon appetito!

Roasted Red Pepper Alfredo:

Ingredients:
2 teaspoons extra-virgin olive-oil
1 cup chopped yellow onion
2 garlic cloves, grated
2 roasted red peppers or a 12oz jar of piquillo peppers, coarsely chopped
1 cup low fat buttermilk
1/2 cup of plain, nonfat Greek yogurt
4 oz goat cheese
1/2 fresh grated parmesan cheese
1 lb of your favorite pasta, cooked to package directions

Optional Garnishes: Parsley, Chives, Basil, chopped roasted red pepper.  A combination of any or all of these is great.


Beautiful ingredients in all the colors of the Italian flag

 Step One:  Heat the olive oil in a medium saucepan over medium high heat.  Add the onions and cook until softened, but not browned, about 3-5 minutes.  Add the garlic and cook, stirring, and additional minute.  Lower heat to medium and add the peppers, milk, yogurt and both cheeses.  Stir to combine while cheeses melt.
Onions and garlic softening in the olive oil

The peppers make the sauce.  Try roasting your own for a more intense flavor than the jarred peppers

Ahhhh.....melting cheese.  Heaven!

Step Two:  Once cheese is melted, blend mixture with an immersion blender, or allow sauce to cool slightly and transfer to a traditional blender to mix up the sauce.
Sauce is ready for the "boat motor", a.k.a. the immersion blender

The immersion  blender is a great tool for making soups and sauces

This is enough sauce for one pound of pasta.  Feel free to add a drizzle of additional olive oil or s splash of the hot pasta water if the sauce appears too thick.
Pour a glass of wine and sit down with your family to enjoy!