Market Finds

Market Finds
Farmer's Market Bounty

Thursday, August 6, 2015

Easter's Okra


The calendar and the temperature are still screaming summer here in Atlanta, but in my world it is fall.  The children are back in school and I attended my first football game of the season earlier this week.  All of this is a not so gentle reminder that the lazy summer days will soon be coming to an end.  That also means that one of my favorite summer vegetables, okra, will be less abundant in the weeks to come as well.

Fried okra is a staple on my summer menus, and one of the only fried items that sees a regular rotation in my meal planning.  I do occasionally roast my okra.  It is good, but nothing beats the tried and true recipe for fried okra that was handed down to me by my grandmother Zachary.  This okra has a light batter of cornmeal and flour and is shallow fried in a cast iron skillet.  The secret to this tasty side dish is that each individual piece of okra is turned over one by one.  As a hungry and impatient child, I could not understand why my grandmother gently flipped each piece one by one, in what seemed like an eternity to complete a batch.  The only explanation I ever received from the patient cook was, "That's the way Easter did it!"  Easter was my grandmother's housekeeper when my father was a small child.  She got her unusual name because she was born on Easter Sunday, and evidently used to joke that she was grateful she had not been born on Thanksgiving.  I think Easter's sense of humor was just as good as her method for frying okra.

While the days are still long, I highly recommend taking the time to fry up a batch of this okra. Might I suggest that you make sure to double or triple the recipe, as these crunchy nuggets tend to disappear before they even make it to the dinner plate.

Easter's Okra:
Canola oil for frying
1 lb fresh okra
1 cup fine yellow corn meal
1 cup all-purpose flour
1 tsp sea salt
1/2 tsp fresh ground pepper


Directions:
1) Pour oil to a depth of 1/2 inch into a cast iron skillet.  Heat to 350 degrees.
2) Cut okra into 1/2 inch rounds and place in a medium sized bowl.
3) Combine cornmeal, flour, salt and pepper in a gallon sized zip top bag.  Seal the bag and shake to combine ingredients.
4) Add okra to the cornmeal and flour mixture in the bag and shake so that all the okra is thoroughly coated.


5) Use a thermometer to check the temperature of your oil.  If you do not have a thermometer, you may check the oil temperature by placing one piece of okra in the oil.  If the oil sizzles (see photo below), you are ready to start frying.


6) Using a slotted spoon, remove okra from the bag, shaking off any excess coating, and place the okra gently into the skillet, in a single layer.

7) Make sure that all of the okra pieces are lying flat in the pan and cook on the first side for about 2-3 minutes, until golden brown.  Using a set of tongs, flip the individual pieces of okra and allow to cook on the opposite side another 2-3 minutes until golden brown.

8) Using a slotted spoon, remove the okra to a paper towel lined plate and sprinkle with additional salt while still hot.

9) Repeat frying process with any additional okra


Friday, July 31, 2015

Tomato Pie


The tomato and I have not always been on the best of terms, even though I grew up with access to lovely home grown tomatoes from my grandmother's gardens.  I never quite comprehended the conversations I overheard between my mother, aunt and grandmother, discussing the virtues of home grown tomatoes as they happily munched on their mayonnaise laden tomato sandwiches.  Why didn't I like tomatoes?  The answer was simple, my father did not like them, and still doesn't, therefore I did not like them.  Seemed like a reasonable explanation at the time.  In hindsight, I am kicking myself for being a late comer to the joys of a tasty tomato.

Now that I have seen the error of my ways, I anxiously search all summer for the perfect bite of a home grown tomato.  This year I have had my fair share and have been working on some recipes inspired by this luscious fruit.  The recipe I am sharing today is for a savory tomato pie.  It has had several iterations over the past few weeks as I experimented with different types of tomatoes, cheeses and herbs, in search of the perfect combination.  I put this pie together earlier this week and shared it with some of my amazing friends/guinea pigs.  

I hope that you will enjoy these last fleeting weeks of summer and share a slice of this delicious pie with some of your friends and always remember to make every (pie) plate something to be passionate about!


Beauty Shot: Savory pie topped with fresh herbs and avocado


Tomato Pie:
1 each red, green and yellow heirloom tomatoes
1 9" pie shell
1 cup grated sharp white cheddar
1 cup grated parmigiano reggianno
1/2 cup non-fat Greek yogurt
1/2 cup light olive oil mayonnaise
2 scallions, chopped
1/4 cup chopped basil

Garnish:
1 Avocado, Diced
1/2 cup mixed fresh herbs including dill, chives and basil

Directions:
1) Slice tomatoes into 1/4" slices and place in a single layer on a paper towel lined sheet pan. Sprinkle tomatoes with sea salt and cover with another layer of paper towels.  Place a second sheet pan on top of the paper towels to act as a weight.  Set tomatoes aside and let sit for at least 30 minutes.

This step is very important and it will help remove moisture from the tomatoes.  No one likes a soggy pie!
2)Dock your thawed pie crust and blind bake for 10 minutes at 400 deg.  Allow to cool 15 minutes before filling.


3) In a medium sized bowl, combine the remaining ingredients (cheddar through basil) to form the filling
The filling should be fairly thick, similar to a pimento cheese consistency

4) Places slices of tomato in a single layer onto the cooled pie crust.  You may have to cut some of the tomatoes to fit.
Squeeze as many tomatoes as you can onto that bottom layer

5) Scoop all of the filling onto the tomato layer and spread out using the back of a spoon so that none of the tomatoes are showing
Make sure to spread your filling all the way to the edge of your crust

6) Arrange the remaining tomatoes on top of the filling.
I like to cut my tomatoes in half and arrange in a fan shape…do whatever you like, just make it pretty!

7) Place foil around the crust, so as to avoid over browning.  Place the pie in a 400 degree oven for 30 minutes, until filling is bubbling and heated through.
Don't forget to tent the exposed crust with foil.  This will prevent it from burring as the filling cooks.

8) Remove pie from oven and allow to cool for 10 minutes before garnishing and serving.


*I used a store bought crust for this recipe, but feel free to make your own pastry if you are so inclined.  Additionally, this same technique would work equally as well on a free-form galette crust


Monday, May 4, 2015

Potato Palooza:

My beautiful bowl of leftover potatoes

The bowl of tasty tubers pictured above, were what was remaining from two lovely weekend meals, shared with family and friends.  The sliced sweet and red potatoes had been roasted in olive oil and herbes de Provence for a pinot noir wine tasting on Friday night and the lovely yellow ones were the sole survivors from Sunday's low-country boil for the family.   It is rare for me to have this many potatoes in one weekend and certainly rarer to have so many leftover.  So, Monday morning found me pondering ways to repurpose these vegetables.

First off, the quesadilla is my go-to vehicle for leftovers.  As far as I am concerned, you can stuff just about anything into a tortilla, cover it with cheese, crisp it up in a skillet and achieve positive results.  Being that Cinco de Mayo is tomorrow, I am already planning a black bean, sweet potato and mushroom quesadilla for my dinner on Tuesday.  Olé!

The zesty sliced red potatoes will be made into a frittata that I can portion out and eat on all week as a grab and go breakfast or snack.  

Two dishes down, nothing earth shattering here, just good, reliable uses for my potatoes. With one more type of potato, patiently awaiting it's new assignment,  it was time to come up with another  re purposing recipe to add to my repertoire.  A formula that could be used for this week's yellow potatoes, but versatile enough for whatever protein or veg that may be lingering in my fridge come next Monday.  

Inspired by a recent visit to an Indian restaurant, I thought a curry would be a superb opportunity to introduce some new flavors to the family.  Thus was born, my Potato and Chickpea Curry.  This came together quite simply from some of my staple pantry items such as: chickpeas, coconut milk, curry paste, turmeric and garam masala.  The method is simple and can be adapted to whatever leftover meat or vegetable you might find yourself with.

I hope you will sample this quick curry recipe and always remember to make every plate (even leftovers) something to be passionate about!

This is my new "quesadilla"!!! LOL!

Potato and Chickpea Curry:

Ingredients:
2 tablespoons of extra-virgin olive oil
1 small onion, chopped
1 teaspoon ground turmeric
1 teaspoon ground cumin
1 tablespoon ground garam masala
4 cups diced and cooked yellow potatoes
1 can chickpeas, drained and rinsed
1 tablespoon curry paste
Salt to taste

Optional Garnish:
Greek yogurt
Chopped cilantro
Chopped tomatoes

Method:

Heat olive oil in a large, high-sided skillet, over medium high heat.  Add onion and cook, stirring occasionally, until softened.  About 3-5 minutes.

Add dried spices and stir so that onions are covered.

Next, tip in the potatoes, chickpeas coconut milk and curry paste. Stir to combine. Bring mixture to a boil, then simmer until sauce is slightly thickened, about 7-8 minutes. Add salt to your taste.
Yellow potatoes and chickpeas luxuriating in warm spices and coconut milk

Remove mixture to a serving bowl and garnish with Greek yogurt, tomatoes and cilantro if desired.


Thursday, March 5, 2015

In The Raw


Raw beef carpaccio is not an item that has ever been on my weeknight dinner rotation, nor on any my professional menus.  In fact, until last Friday evening, it had been many years since this delicacy had even touched my lips .  So, why has carpaccio been occupying a pesky spot in my brain this week?  Well, it is because my lovely dinner companions at Bottega restaurant in Birmingham, AL ordered it as one of our appetizers.  At the time, I was much more interested in the crispy fritto mixto and the creamy parmesan soufflé  that were en route to our cozy corner table.  While all of the offerings were impeccable in their own right, it was the memory of the carpaccio that lingered the following day.  The cool, thin slices of beef, peppery arugula and sharp parmesan shavings were a perfect trio.  But wait, there was something else.  A thin shmear of horseradish cream added just the right pop of heat to the rest of the ingredients, binding them together in perfect harmony.  How could I bring these flavors into my day to day life?

The arugula, parmesan and a lightened up horseradish cream were no-brainers, but what could I substitute for the thinly sliced raw beef?  I toyed with the idea of seared rare tenderloin, but that is certainly not a practical week night substitute.  Rare deli roast beef? Absolutely not!  Smoked salmon?  Perhaps a good match with the arugula and horseradish, but not so much with the cheese.  The answer was clear, It had to be mushrooms.  Meaty portabellas are much more economical than beef and would be the perfect fit with the rest of the ingredients.  

The result of all this pondering, is my Mushroom "Carpaccio" Salad.  This is a simple and elegant salad that is suitable for a weeknight dinner or a special occasion.  I plan on enjoying this salad often, and when I do, I will fondly recall the wonderful evening spent with a fun group of my foodie friends.


Mushroom "Carpaccio" Salad:
Yield: 2 first course sized salad

For the Salad:
1/4 cup extra-virgin olive oil
2 portabella mushrooms, about 6-8 ounces total
Sea salt and fresh cracked black pepper to taste
2 cups arugula
1/3 cup shaved parmigiano-reggiano cheese
2 teaspoons chopped fresh chives
2 red grape tomatoes, quartered
2 yellow grape tomatoes, quartered


For the Dressing:
1/4 cup light olive oil mayonnaise
1/4 cup non-fat Greek yogurt
1/4 cup light buttermilk
1/4 teaspoon sea salt
1/4 teaspoon ground white pepper

Directions:
1) Heat a non-stick skillet, brushed with a light coating of olive oil over medium-high heat.  
2) While pan heats,  carefully slice the mushroom caps into 1/8" rounds.  Each mushroom should yield about five rounds.  
3) Brush each side of the mushroom slices with olive oil and sprinkle with salt and pepper.  Add slices, in a single layer to the hot skillet and cook 1-2 minutes per side, until edges are browned and middle is cooked through.  This may need to be done in batches, depending on the size of your pan.


Mushroom slices sizzling away in a hot skillet
4) Remove cooked mushrooms to a paper towel lined plate and place in the refrigerator to cool for thirty minutes.
5) While mushrooms are cooling, combine all of the dressing ingredients in a small mixing bowl and whisk to incorporate.  You will have more dressing than you will need for this salad.  Leftover dressing may be kept refrigerated for up to 3 days.
6) Assemble the salad by  drizzling 1 tablespoon of dressing over a salad plate.  Shingle 5 cooled mushrooms in a circular pattern in the center of the plate.  Top mushrooms with one cup of arugula and sprinkle with shaved cheese and chopped chives.  Arrange quartered red and yellow tomatoes around plate.  Repeat on a separate plate with remaining ingredients.


Buon Appetito and remember to make every plate something to be passionate about!

Thursday, February 26, 2015

Rancho La Puerta


Grapevines in the shadow of Mt. Kuchumaa
As I gaze out the window on this snowy day in Atlanta, I am longing for the crystal blue skies and warn sunshine of Mexico.  Fortunately, I brought home with me many beautiful photographs and fond memories of my week long experience at Rancho La Puerta.  I am extremely grateful to have had the opportunity to travel to this magical place as Nancy Waldeck's Sous-Chef.  Not only did we get to enjoy all of the amenities offered at the ranch, we were able to pick vegetables from the organic garden and cook in their top notch cooking school, La Cocina Que Canta.

La Cocina Que Canta, or "the kitchen that sings", in English, is truly a chef's dream.  A floor to ceiling picture window sheds natural light into the brightly hued teaching kitchen and dining room.  Birds really do sing outside the window and Chef Denise Roa's staff hums along with clock-like precision.  Adding to this idyllic setting is the incredible organic garden, which is headed up by the ebullient head gardener Salvador.  Ninety percent of the vegetables used in our cooking class came from this garden.  Beets, carrots, kale, rainbow chard, herbs and lettuces all picked moments before they were cooked and all tasting like the best version of their particular variety.  I now truly know the definition of "fresh" and will be a bit nostalgic for this garden when I return home and do my first grocery run at my local supermarket.
Head gardener Salvador showing off the fruits of his labor
There may never be a more beautiful beet than this one!
Chef Nancy Waldeck, Executive Chef Denise Roa and yours truly


The students did an impressive job preparing and styling their dishes.

In addition to working in the cooking school, we had plenty of time to take advantage of all of the amenities at the ranch as well.  The days were filled with morning hikes, yoga and stretch classes, sunbathing, spa treatments, meditation, lectures and sound healing.  There was an activity every hour on the hour from 6am until 8pm.  It was quite impressive how much I was able to squeeze into a day and still be sound asleep before nine o'clock every night.  Rest, relaxation and unplugging from the outside world for a few days really does wonders for the body and spirit.  

Rancho La Puerta truly was a life changing experience for me and it is easy to see why many of the people I met at the ranch were repeat visitors.  So, until my next visit south of the border, I plan on channeling this warm, healthy feeling in my day to day life.  Stay tuned for some ranch inspired recipes in the weeks to come and remember to make every plate something to be passionate about.
Love this outside chalkboard.  Each day brought a new,  inspiring quote.


Monday, February 9, 2015

Who's Your Crawdaddy?


Last Monday, I finally had the occasion to take my ten year old son Zach, to the Buford Highway Farmer's Market. He came willingly, with the promise of ramen noodles, Japanese "Sprite", and a big fish that we would take home to cook for dinner. The trip did not go exactly as planned however, but it was still quite an adventure.

We began cruising the produce department, Zach's eyes wide, taking in the array of exotic fruits and vegetables. He wondered if we should buy an enormous jack fruit to put in his sister's lunchbox as a joke. We opted for a dragon fruit instead. We picked up some baby bokchoy and wasabi peas before heading to the seafood counter to source our dinner. We walked slowly down the length of the counter, looking at all of the beautiful whole fish and other seafood. Zach even struck up a conversation with a fishmonger and inquired about the snails and octopus. I loved watching his genuine curiosity and lack of shyness. I loved the fact that he is interested in food and cooking. I loved the fact that were were going to have a fresh fish to prepare for dinner that night. Or were we?

My dreams of a fish dinner came to a screeching halt when we happened upon the very last section of the seafood department. "Crawdads!", Zach yelled. He has been having a bit of an obsession with crawfish ever since the Super Bowl in New Orleans, earlier in the month. We had wanted to have a crawfish boil that day, but had not found any live ones for our pot and ended up with red beans and rice instead. So, after his month long wait, he was finally going to get his crawfish boil. I let him pick out some to take home with us. He took his time picking out the "best" ones with the tongs and carefully placing them in the bag of ice. I should have known we had a problem, when the child inquired if the crustaceans could breathe in the bag.
We finished our exploring and checked out with our multitude of exotic goodies. As we were loading the grocery bags into the trunk, Zach asked if he could hold the bag of crawfish on his lap. On the way home, I watched my child peek into the bag every so often to see if the crawfish were still alive. I could tell, that not only were we not having fish for dinner, we were not having a crawfish boil either. I was told matter of factly that we could not kill these crawdads. Zach spent the rest of the ride home, googling what crawfish eat and how to take care of them. Lucky for these little fellas, we had a brand new aquarium at home, that was in need of inhabitants. So now, over a week later, that bag full of crawfish, originally destined for my stockpot, are now living a life of luxury in a twenty gallon aquarium, in my basement.

Turns out Zach is a great "craw daddy" himself. His brood gets plenty of shrimp pellets and decaying lettuce and are doing quite well, despite the fact that one of them had his claws ripped off by one of his tank mates. I'm not sure how long these "pets" will be around, but I know for certain, they will be well taken care of while they are in Zach's care.

Of course, I could not write a recipe for a crawfish boil, or pasta or dip after this crazy, yet heartwarming story. So, a vegetarian dip, inspired by all the goodness of a Cajun crawfish dip is what is on the menu for today.

Cajun Crawdaddy-less Dip:

Ingredients:
2 teaspoon extra-virgin olive oil
1 celery rib, diced
1 red bell pepper, diced
1/3 cup dice red onion
1/2 cup sliced scallions, green and white parts
3 garlic cloves, grated on microplane
1 cup of thawed yellow corn
1 8oz block neufchâtel cheese, room temperature
2 tablespoon grated parmesan cheese
8 oz sharp white cheddar cheese, grated (divided)
1 teaspoon creole seasoning
1 teaspoon old bay
1/4 teaspoon cayenne pepper
Chopped parsleyfor garnish


Step One:
Heat Olive oil in a skillet over medium- high heat and add the celery, pepper, red onion and scallions. Allow vegetables to soften, while stirring occasionally, for about five minutes. Add, garlic, corn and seasonings. Stir to combine and cook two more minutes.

Step Two:
Place Neufchâtel, parmesan and 4oz of cheddar in a medium bowl along with vegetables. Stir to combine.

Step Three:
Place ingredients into a medium sized baking dish that has been sprayed with nonstick cooking spray. Bake at 350 degrees for 25-30 minutes until bubbly and beginning to brown slightly on top. Garnish with chopped parsley if desired and serve with crudités or a crusty baguette.


I loved the fact that this dip is vegetarian, but still subtly reminds my tastebuds of the flavors of a seafood boil.  Keep it passionate people!  Cheers!


Top O' The Mornin' To Ya!

Going back to the archives today for a little taste of Ireland. This recipe was inspired by a trip to and Irish pub at Downtown Disney in Orlando,FL.  This year I will not be in   Florida for St.Patty's Day, but gathering with some neighbors for a pint and an Irish dinner. 

I leave you with a cute quote about one of my favorite beverages...

"Only Irish coffee provides in a single glass all four essential food groups: alcohol, caffeine, sugar and fat."

-Alex Levine


Inspiration for new recipe ideas and blogs come from many different places.  I am always on the lookout for a new story to tell and a new dish to create.  Some weeks, this comes easier than others.  The past few days for me have been filled with Cheerleading, Disney World and long hours in the car.  As you can imagine, none of these events, as fun as they were, really got my culinary creative juices flowing.  I was beginning to think I was going to have to fashion some quinoa and kale into a Mickey silhouette.  As luck would have it, my idea came to fruition on our last evening in Orlando.

We had dinner at the Raglan Road Irish Pub in Downtown Disney.  Our group was weary from the weekend's activities and were happy to sit down to a meal that was not being carried to the table on a plastic tray. Truly, I was at the point of wondering whether or not I still knew how to use a knife and a fork.

Our drinks arrived along with a beautiful loaf of hearty, still warm, bread.  The bread was accompanied by what appeared to be a saucer of olive oil and balsamic for dipping. As it turns out, this was no ordinary oil and vinegar dipping sauce.  It was in fact, according to our waitress, a reduction of Guinness and brown sugar that was floating on top of the oil.  Unfortunately for my table mates, they got to spend the next thirty minutes listening to me talk about how great the bread and the dipping sauce were.  I savored each taste of the oil and Guinness concoction as if it were a fine wine.  I loved the sweetness of the brown sugar and the underlying tang of the beer.  The whole time I kept thinking of how great this syrupy mixture would taste on a stack of pancakes or french toast.  My friend Emily, suggested that I recreate this for my blog.  Great idea!  So much better than a Mickey shaped quinoa burger and certainly appropriate for the upcoming St. Patrick's Day holiday this weekend. 

So, instead of pancakes or french toast, I opted for a more hearty and stick to your ribs kind of dish.  I chose steel cut oatmeal as the perfect vehicle for this intoxicating elixir.  Okay, and who am I kidding, if you are embarking on a days of St. Paddy's Day shenanigans, a nice bowl of oatmeal in the tummy provides a lovely base/sponge for the festivities ahead.

Top O' The Mornin' Elixir:

1 bottle of Guinness stout, less one sip for the cook
3/4 cup of dark brown sugar
1 cup of steel cut oats
3 cups water
pinch of salt


Step One:
Place Guinness and brown sugar in a saucepan and bring to a boil over high heat.  Lower heat to medium-high and reduce the liquid by half.  This will take about 20 minutes and you will end up with approximately 1/2 cup of syrup.


Step Two:
In a separate saucepan, bring the three cups of water to a boil and slowly stir in the oats and add the pinch of salt.  Reduce to a simmer and cook for 25-30 minutes. This mixture will need to be stirred frequently to prevent burning on the bottom.  This recipe will yield 2 generous portions of oatmeal or 4 smaller ones.


 Since there is alot of stirring and cooking over a 30 minute period of time, I suggest you tuck into a nice hot cup of coffee.  Feel free to add whatever type of "fortification" you desire to you mug.

Once the liquid has sufficiently reduced, it will lightly coat the back of a spoon.  The mixture may still appear a bit thin to you at this point, but will continue to set up and thicken as it cools.

Step Three:
When oatmeal is cooked to your liking, place in a bowl and drizzle with the Guinness syrup.


Have a safe and happy St. Patrick's Day and remember to make every plate something to be passionate about!


Farro Out!

My recipe this week was inspired by the box of farro that has been sitting patiently on my shelf for the past couple of weeks, waiting to be put to good use.  Farro (pronounced FAHR-ro), is a ancient grain that dates back thousands of years.  It is part of the wheat family and has been popular in Italy for centuries, and more recently, gaining popularity in the United States. Despite its bland appearance, farro has a wonderfully nutty flavor and a toothsome texture.  Combine that with the throaty rolling rrrrrrrrrr's of its Italian pronunciation and you truly have something to be passionate about.

As it is the week before Easter Sunday, I had the intention of using my box of farro in a spring salad side dish, perfect for the holiday table. I stuck to my original idea, even though the weather in Atlanta this week was far from spring-like.  I was able to pull this recipe together using ingredients that I had on hand.
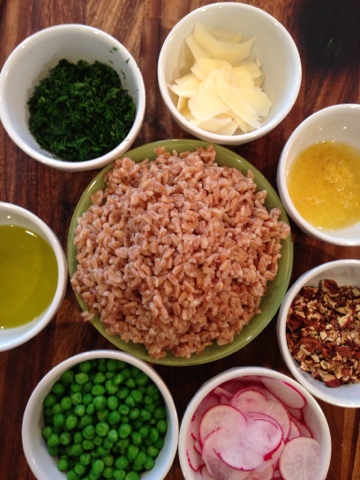
Radishes, Parsley, Dill, Lemon, Frozen Peas, Toasted Pecans and Parmesan Cheese for the Farro Salad


If you have not yet had the opportunity to give farro a try yet, I highly recommend this versatile grain.  It is perfect for cold or room temperature salads, as well as served hot as a substitute for rice or quinoa.  I hope you enjoy my version of this light farro salad and enjoy your spring holiday.  Here's to warm weather, lots of sunshine and a plate to be passionate about!


Farro Primavera:
Serves 6-8 as a side dish

1 1/2 cups of pearled farro*
3 cups water
1/2 teaspoon sea salt
5 radishes, very thinly sliced (a vegetable peeler makes quick work of this technique)
1 cup frozen peas, thawed
1/2 cup chopped toasted pecans
1/4 cup chopped dill
1/4 cup chopped parsley
1/4 cup shaved parmesan (use the vegetable peeler for this too)
juice and zest of 2 lemons
3 tablespoons of extra-virgin olive oil
Sea salt and pepper to taste


Step One:
Place farro, water and salt in a medium saucepan and bring to a boil.  Reduce to a simmer, cover and continue cooking for 20 minutes, until tender.  Drain any excess water.

Step Two:
Once farro is cooked and drained, place into a large bowl and add the remaining ingredients and stir to combine.

Step Three:
Place salad in serving bowl or platter and garnish with additional cheese, herbs and nuts if desired.


*Pearled farro does not need to be soaked prior to cooking.  If you have regular farro, you will need to soak for at least one hour or up to overnight, drain, and the proceed with cooking as directed above. 

Wednesday, February 4, 2015

Southern (Italian) Accent:

Sicilian Inspired Shrimp Pasta
It is a rare occasion when I get to spend time with just my parents and sister.  No spouses or kids, just our original Zachary foursome.  We joke that the only time this happens is for funerals, so when we are able to spend some quality time together for a happy occasion, we cherish it.  As it happens, we had such a gathering in Charlotte earlier this month.  My father had won a wine tasting in a silent auction at the International House gala.  The prize had been donated by Sara Guterbock of the Mutual Wine Distributing Company.

A tour of southern Italian wines was to be the theme of the evening, so without hesitation, I immediately wanted to figure out what we were going to eat on this epic journey through southern Italy.  Since my own travels had not taken me to the tip of the Italian boot, I had to do a bit of research before deciding on a menu.  I knew that seafood was a must and was pleased to discover that sardines and anchovies were popular choices in the region.  Sadly, no one else shared my enthusiasm for these fishy delicacies, so I opted for the ever popular shrimp instead.  Of course, I did sneak some anchovies into the pasta dish for kicks and giggles, as you will see in the recipe below.  Another interesting discovery about Sicilian food was that instead of using cheese as a garnish for seafood pasta, they instead opt for crushed toasted almonds and/or toasted bread crumbs.  To round out the buffet table, the guests contributed an assortment of Italian cured meats and cheeses, arancini, caponata, olives, grissini, and canoli for dessert.

The wine tasting consisted of two whites and six reds.  Sara led us on a magical journey through Basilicata, Calabria, Puglia, Sicilia, Sardegna, and Campania.  The history of the various wineries, grapes and geographical regions was fascinating and I was once again bombarded with the enormity and complexity of the wine world.  My favorite white of the evening was the Alovini 2012 Greco from Basilicata and if I had to pick a favorite red,  I would go with the Cantale 2012 Primitivo from Puglia.
Our tour of southern Italy
Sara Guterbock, CS, CSW, ISS, DWS
Sommelier and Wine Educator,  Mutual Distributing Company, N.C.
Now THIS is my kind of potluck!

Of course the best wines are those that are shared with friends, and this evening was filled with them both.  In the future, when I make my Sicilian inspired shrimp pasta, I will fondly remember my virtual tour to southern Italy and the people, food and wine that made this an evening to be passionate about.

Sicilian Inspired Shrimp Pasta:
 Serves: 4-6

Ingredients:
1 lb medium shrimp, peeled and deveined
1/4 cup ground almonds
1/4 cup Italian seasoned breadcrumbs
16 oz of short pasta, such as gemelli or campanelle
1/4 cup extra-virgin olive oil
4 anchovy fillets, drained and chopped
1/4 teaspoon red pepper flakes
1 1/2 teaspoon garlic, grated on micro plane, about four cloves
Juice and zest of 1 lemon
1/2 cup of dry white wine
1/4 cup shrimp stock
1 tablespoon unsalted butter
1/4 cup chopped parsley


Directions:

1) Peel and devein shrimp, reserve shrimp and prepare Quick Shrimp Stock.  Reserve shelled shrimp. Follow instructions below:
Quick Shrimp Stock:
1) Place shells is a medium saucepan, lightly coated with olive oil .
2) Cook over medium-high heat until shells are bright pink in color
3) Add 2 1/2-3 cups water, enough to just cover shells, a halved lemon and about four garlic cloves and simmer for 30-40 minutes
4) Strain shells from liquid (You will end up with about 1 cup of stock)


2) Heat a small, non-stick sauté pan over medium heat.  Add ground almonds and cook, stirring constantly, until fragrant and toasty.  About 3-4 minutes.  Remove almonds from pan, set aside. Repeat process with the breadcrumbs.  Combine almonds and panko and set aside.

3) Cook pasta according to package directions

4) While pasta is cooking,  heat olive oil over medium-high heat in a large, high-sided skillet.  Add the anchovies and cook, pressing down with the back of a wooden spoon, until anchovies are almost completely dissolved.  Stir in red pepper flakes and garlic and cook for one more minute.

5) Add lemon zest, juice, wine and stock.  Bring to a boil then reduce to a simmer.  Simmer sauce for 5 minutes, the whisk in the butter and parsley.

6) Add reserved shrimp to sauce, stirring to coat with the sauce.  Cook until shrimp is just cooked through, about 3-4 minutes. 

7) Combine cooked and drained pasta to sauce and toss to combine.  Place pasta in individual serving dishes and top with the almond-panko mixture.


Sauce is ready for the pasta